

Want to set off on a big trip, but the cost and complexity of typical overlanding gear put you off? In many cases it pays to think outside the box instead of blindly trusting the best practices preached by the community. In this series, I present practical, affordable solutions for pragmatic adventurers. In this article, I describe a simple power setup that uses power banks instead of a second battery.
Many overlanders and campers travel with hefty lead-acid or lithium auxiliary batteries, sophisticated charge control and large solar panels on the roof. After all, fridges and diesel heaters are hungry for power. — But is that really the gold standard for every traveler? Before you sprint off to the overlanding gear store, ask yourself these questions first: “Do I really need refrigerated food and drinks on the road? Do I need a diesel heater on my trip?” — If you can answer no to both and only need to power your electronics, i.e. phones, laptop, camera etc.: Congratulations, your power setup can be at least two sizes smaller, lighter and cheaper! With simple power banks, a foldable solar panel, some charging electronics and wiring, you’ll even be self-sufficient indefinitely!
Traveling without a fridge
In our experience, this works just fine — and without having to give up good, healthy food. Most vegetables keep better unrefrigerated anyway. If you don’t insist on fresh meat or dairy on your plate every day, you can eat well with hardly any compromises. Even perishables can be transported without cooling for a limited time. The best place for them is the coolest spot in the vehicle, e.g. the spare wheel well. If you need milk in your coffee or muesli: outside Central Europe, powdered milk is usually easy to find and keeps practically forever. In the evening, the beer goes into the nearest stream to cool, if possible.
At a glance
Time required: 1-2 afternoons
Material costs: 200-400 euros, depending on whether you go for no-name or brand-name components
Savings: Financially: three to four figures, compared with a setup that includes a fridge and the matching power supply. Weight savings: 10-30 kg. You also gain space inside the vehicle (the individual components can be installed so that they take up practically no space).
Other advantages: In an emergency, you can charge a flat starter battery with solar, or keep it topped up when the vehicle is parked for a long time. Faulty components can be replaced individually. If, like us, you want to interrupt your trip now and then: power banks under 100 watt-hours can usually be taken in your carry-on luggage on flights.
Prior knowledge: Basic knowledge of automotive electrics, i.e. safety measures, sizing and fusing cables correctly, crimping connectors etc. — If you’re new to this or don’t feel confident doing it yourself, it’s best to install the system together with someone experienced in automotive electrics, or have it installed.
Limitation: The setup is designed for vehicles without a smart alternator. Switching via the voltage-sensing relay requires the alternator to charge continuously whenever the engine is running.
No-DIY alternative: a portable power station (“solar generator”)
Power stations are basically beefed-up power banks. Besides the battery itself, they come with several charging inputs (12 V, solar, AC), USB, 12 V and AC outputs and, depending on the model, other gimmicks.
Pros: Little to no DIY effort, a ready-made solution at a similar price. Plus you get an AC outlet.
Cons: A big box that takes up space. Usually slow charging via the 12 V input. If something breaks, you need a whole new power station. Frequent compatibility issues (e.g. not all USB-C voltages and not all solar panels are supported). Not allowed on planes.
How it works
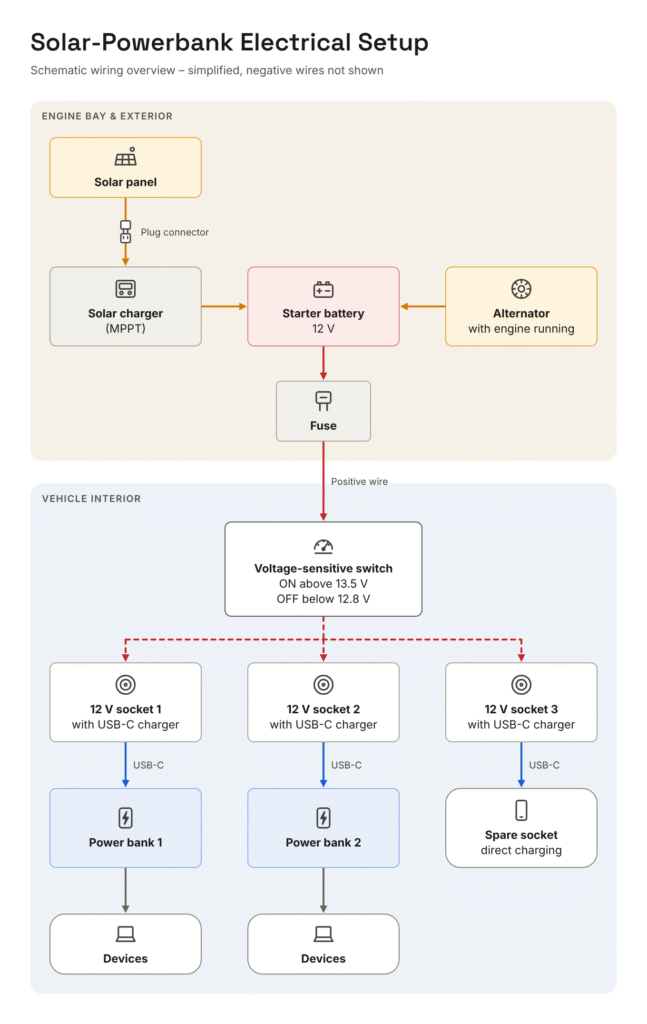
The power banks are charged either by the engine while driving or by the sun via a solar panel. Since USB power banks can’t be hooked up directly to a solar panel, we use the starter battery as a buffer, which the solar panel feeds via the MPPT controller. Whenever the starter battery is being charged — whether by solar or by the engine — a voltage-dependent switch (“voltage-sensing relay”) activates the charging line to the power banks. The upshot: as long as the engine and/or the solar panel are producing power, the power banks are charged. If neither is producing power, the switch disconnects the line and the starter battery isn’t drained. This lets us use off-the-shelf power banks without any special solar charge control.
How to build it
Shopping list
- MPPT solar charge controller, suitable for 12 V lead-acid batteries
- Solar panel (foldable or fixed)
- Voltage-sensing relay (VSR; often also sold as a battery protector or voltage control switch)
- Fuse holder + fuse
- Automotive cable of adequate cross-section
- Solar cable
- Power banks
- USB-C car chargers
- 12 V car sockets (cigarette lighter sockets)
- For a non-fixed solar panel: MC4 connectors
- Installation material as needed (cable lugs, heat-shrink tubing, electrical tape, wire ferrules, …)
Pay attention to the following when choosing components:
- Cable and fuse: Rated for the current draw. I used 6 mm² cable (approx. 10 AWG) and a 20 A fuse.
- Power banks:
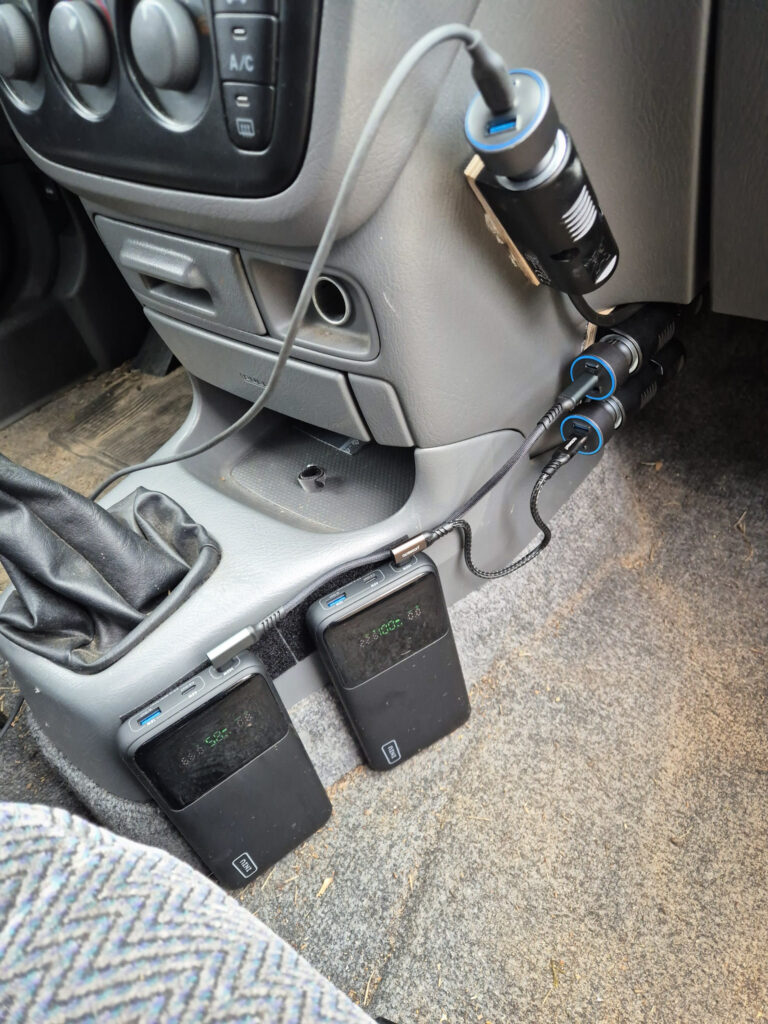
- Capacity as needed. We have two power banks with 99.9 Wh/27,000 mAh each. In everyday travel, that easily keeps three smartphones, a camera, a laptop and various small gadgets going.
- The highest possible USB-C input power for short charging times. In our case, 100 W per power bank.
- Outputs that match your devices (pay attention to the supported USB-C PD voltages here: at least 5, 9, 15 and 20 volts should be supported).
- Important: pass-through capable. The power bank should be able to power devices while it is being charged.
- Chargers: Ideally, they should match the maximum input power of the power bank (in our case 45 W each, so there’s still room for improvement). We also installed an additional charger that can power devices directly. Watch out: many car chargers have multiple USB ports. The small print almost always says that the output per port is reduced when several devices are connected. So it’s better to use a separate charger for each power bank. Here too, as with the power bank, check the supported USB-C PD voltages.
- Solar panel and charge controller: Whatever suits you in terms of size, weight and cost. The starter battery acts as a buffer, so the system can handle both large and small solar outputs. Just make sure the MPPT charge controller can handle the solar panel’s output. We have a 100-watt foldable solar panel. That’s plenty for us in sunny Central Asia.
- Voltage-sensing relay: Make sure you buy a model with freely configurable cut-in and cut-out voltages.
Installation
Note: Botched wiring can have serious consequences. So work carefully and get expert help if in doubt.
1. Solar
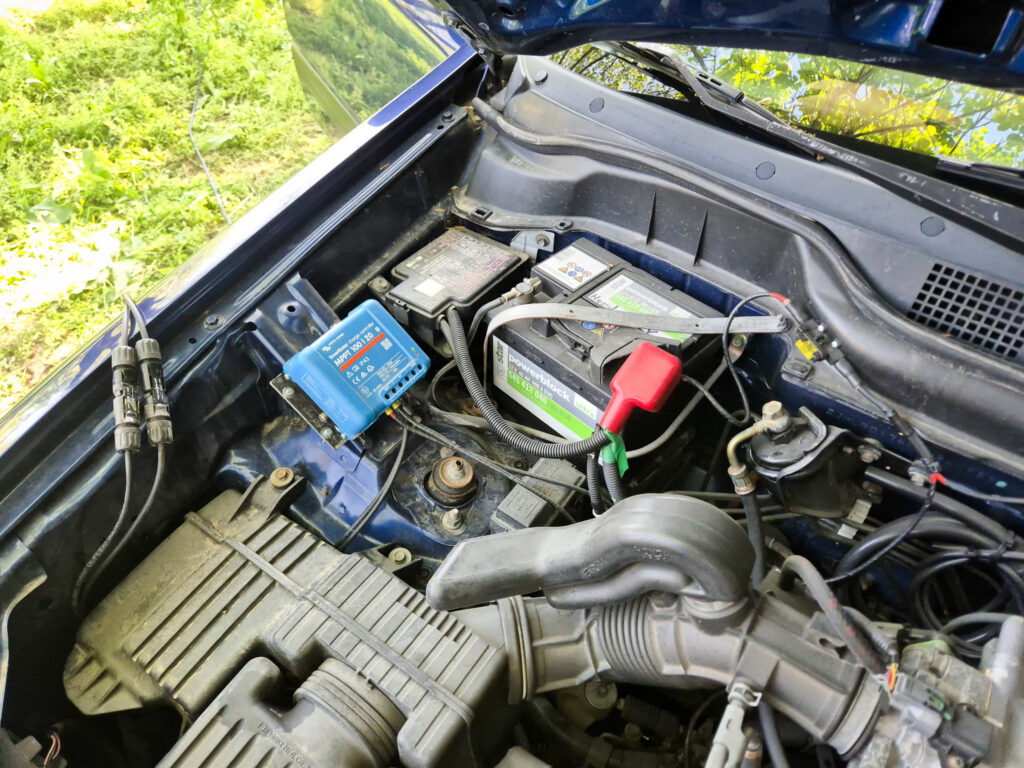
Connect a sufficiently thick cable to the positive terminal of your starter battery. With our three USB-C chargers, I chose 6 mm². Fuse the cable as close to the battery as possible (20 A in our case). After the fuse, split the cable: one branch goes to the interior, the other to the solar charge controller. Ours found a spot in the engine bay (keep enough distance from hot engine parts!). So connect the positive lead to the corresponding terminal on the charge controller, plus a ground wire to the charge controller. Then set the charge controller to the battery type “lead-acid”.
Now you need to decide how to connect your solar panel: we opted for a foldable solar panel that we connect when needed and set up in the sun. You can of course also install a panel permanently, e.g. on the roof. In our case, I installed MC4 connectors at the solar input of the charge controller, which the foldable panel plugs into.
2. The voltage-sensing relay
Route the other branch of the positive cable to the voltage-sensing relay. Depending on space, this can be in the engine bay or inside the vehicle. I put ours in a junction box under the driver’s seat. To work, the voltage-sensing relay also needs a ground connection. Then it’s time to configure the right voltages: set the cut-in voltage to 13.5 volts. This voltage is only reached when the starter battery is actively being charged. Set the cut-out voltage to 12.8 volts. A fully charged starter battery sits at 12.6 volts. The setting ensures that your setup won’t drain the starter battery. If possible, you can also set a switching delay of, say, one minute. This prevents rapid toggling on and off when solar output is low.
3. Sockets and USB-C chargers
Now install the 12 V sockets as close as possible to where the power banks will go. Wire them to the output of the voltage-sensing relay. You can also fuse the sockets individually if you want to be on the safe side. Then connect the sockets to ground. Now plug the USB-C chargers into the sockets. Your charging setup is complete.
4. Power banks and test run
Finally, connect the power banks to the chargers. Before you hit the road, test the whole thing thoroughly:
- Connect the solar panel. Do the chargers switch on after a short delay? [No? Check the battery voltage. Depending on the result, the problem may lie with the charge controller, the voltage-sensing relay or the wiring in between.] Do the chargers switch off again when the panel is disconnected?
- Start the engine. Do the chargers switch on after a short delay (usually indicated by an LED)? [If not: check the wiring or the voltage-sensing relay configuration.] Do the chargers switch off again when the engine is turned off?
- Do the power banks charge at the expected speed? [No? Try other USB-C cables. Not all cables support all voltages.]
- Connect devices to the power banks. Do the devices charge at the expected speed? [No? Swap cables, and check the USB-C voltage supported by the power bank and required by the device.] Does pass-through work (the power bank charges devices while being charged itself)?
Translated from German with the help of AI.
Leave a Reply